Are you thinking about sealing hardwood floors yourself but wondering if you will be able to do it?
If it’s your first time sealing, there’s more to it than you may think.
And many contractors will warn you against taking it on as a DIY project.
Yet you will find people online who seal their floors themselves and feel satisfied with the results.
To succeed, you will need to know which products to use and how to seal with proper technique.
You must also have a floor that’s sanded and clean.
In this article, you will learn what it takes to seal hardwood floors like a professional. You will get a high-level overview of the sealing process, a list of supplies, examples of techniques, and a comparison of the best hardwood sealers available.
By the end, you will know how skilled contractors seal hardwood floors, so you can decide whether you want to try and do it yourself or hire a contractor.
What is Hardwood Floor Sealer?
Sealer is the first layer in a system of 3-4 layers, which protects and enhances the look of your floor. One coat of sealer is about as thick as an ordinary piece of paper.
The purpose of sealer is to effectively seal the wood and provide build while minimizing side-bonding.
Overall, sealer improves the ability of the finish to properly layer for a smooth, durable, and beautiful look.
However, sealer alone won’t give you adequate protection or the scratch, scuff, and chemical resistance that a true finish provides.
Sealer and finish work together to provide the highest level of floor durability.
Preparing to Seal Hardwood Floors
You can’t get a flawless finish result without preparing the floor to receive the coatings. This includes sanding and cleaning the floor.
Professionals understand that any imperfections will become obvious once they apply the finish.
A professionally sanded surface is a prerequisite for a beautiful floor.
Sealing Tools & Supplies
Here’s the supplies recommended for contractors for professional floors from start to finish.
As a DIY-er, you can more than likely get by without everything on this list.
- T-bar or microfiber roller: Choose an applicator that’s appropriate for you and the job.
- Tampico brush: This is an optional tool that will take your finishing up a notch and make everything easier. The Tampico is a natural fiber brush that takes the fine dust off the floor and out of the seams, preventing grain raise.If you’re a contractor serious about efficiency and professional quality, the Bona Tampico brush on a dust containment buffer that’s hooked up to a vacuum system is a sound business investment.
- Vacuum: Use a vacuum to remove dust and particles from the floor and after abrading between coats.
- Gloves: You may want gloves if you don’t want to deal with getting product on your hands.
- Moisture reader: It’s best practice to test the floor for moisture before applying any coatings.
- Tray and brush: A paint tray and brush is handy when you’re applying the sealer without any help or when you have chevron, herringbone, or uneven floors.
- Cut-in pad: Use this tool to cut in from the wall before switching to a roller or T-bar.
- Respirator: You will need a respirator for applying oil-based sealers.
- Coating booties: With coating booties, you can keep everything nice and clean. These are inexpensive and perfect for use in commercial spaces or high-end homes.
- Terry cloth: Use for wet-tacking the perimeter of a room to check for issues after coating is dry.
- Microfiber mop: Use for wet-tacking the rest of the floor.
T-Bar Vs. Roller: Which Applicator Should You Use?
Are you going to use a T-Bar or microfiber roller for the bulk of the work?
Most people use a microfiber roller to apply sealer, but manufacturers often recommend a T-bar. You can use either one to successfully complete the job. A roller will be easier for a DIY project.
No matter which applicator you choose, the general rule to applying sealers effectively is consistent coverage. You want to coat the floor evenly while avoiding bare spots and puddles. And you can accomplish this with either tool.
Both the T-bar and roller methods have advantages and disadvantages.
Become proficient with each, and then you will have the skills to handle any type of coating job. No matter which applicator you choose, be sure you know how to use it to get even coverage.
Applicator Size
The size of the applicator depends on the job and the size of the space. 12” T-bar is perfect for residential, the 18” for wide open commercial and gym floors, and the 14” for in between. A 10” roller is the standard for residential spaces.
Applying Sealer with a Microfiber Roller
When using a microfiber roller, you need to have a strong feathering technique because a roller will leave a heavier coat.
You will also want to lower the temperature, raise the humidity, and work without air flow to slow drying time when applying sealer with a microfiber roller.
Use a Roller on Chevron or Herringbone Floors
Use a microfiber roller because the T-bar will leave streaks when going cross-grain.
Use a Roller on Uneven Floors
Use a microfiber roller and the dip and roll method out of a paint tray for uneven floors. This technique involves continuously dipping the roller into the tray and working in 5 ft. wide sections up the floor.
Instead of a pad, use a quality paint brush to cut-in each section you’re working on, and then re-roll everywhere you cut-in.
The Best Hardwood Floor Sealers
The sealer you select will determine how the floor looks once its finished.
A sealer with no pigment added brings out the natural colors of the wood species while a sealer with pigment enhances the color of the wood.
Sealers with white pigment, for instance, can help you achieve a popular freshly sanded look when you use a matte finish over top.
Sealers with white pigment make a light floor lighter and a white floor whiter, which is perfect if you’re going for a Scandinavian or Nordic look.
Another trending style is to apply a white-tinted sealer on dark stained wood for an antique look. However, be extra careful because dark stains/species will highlight application issues when you use white pigment.
Water-Based Vs. Plant-Based Sealers
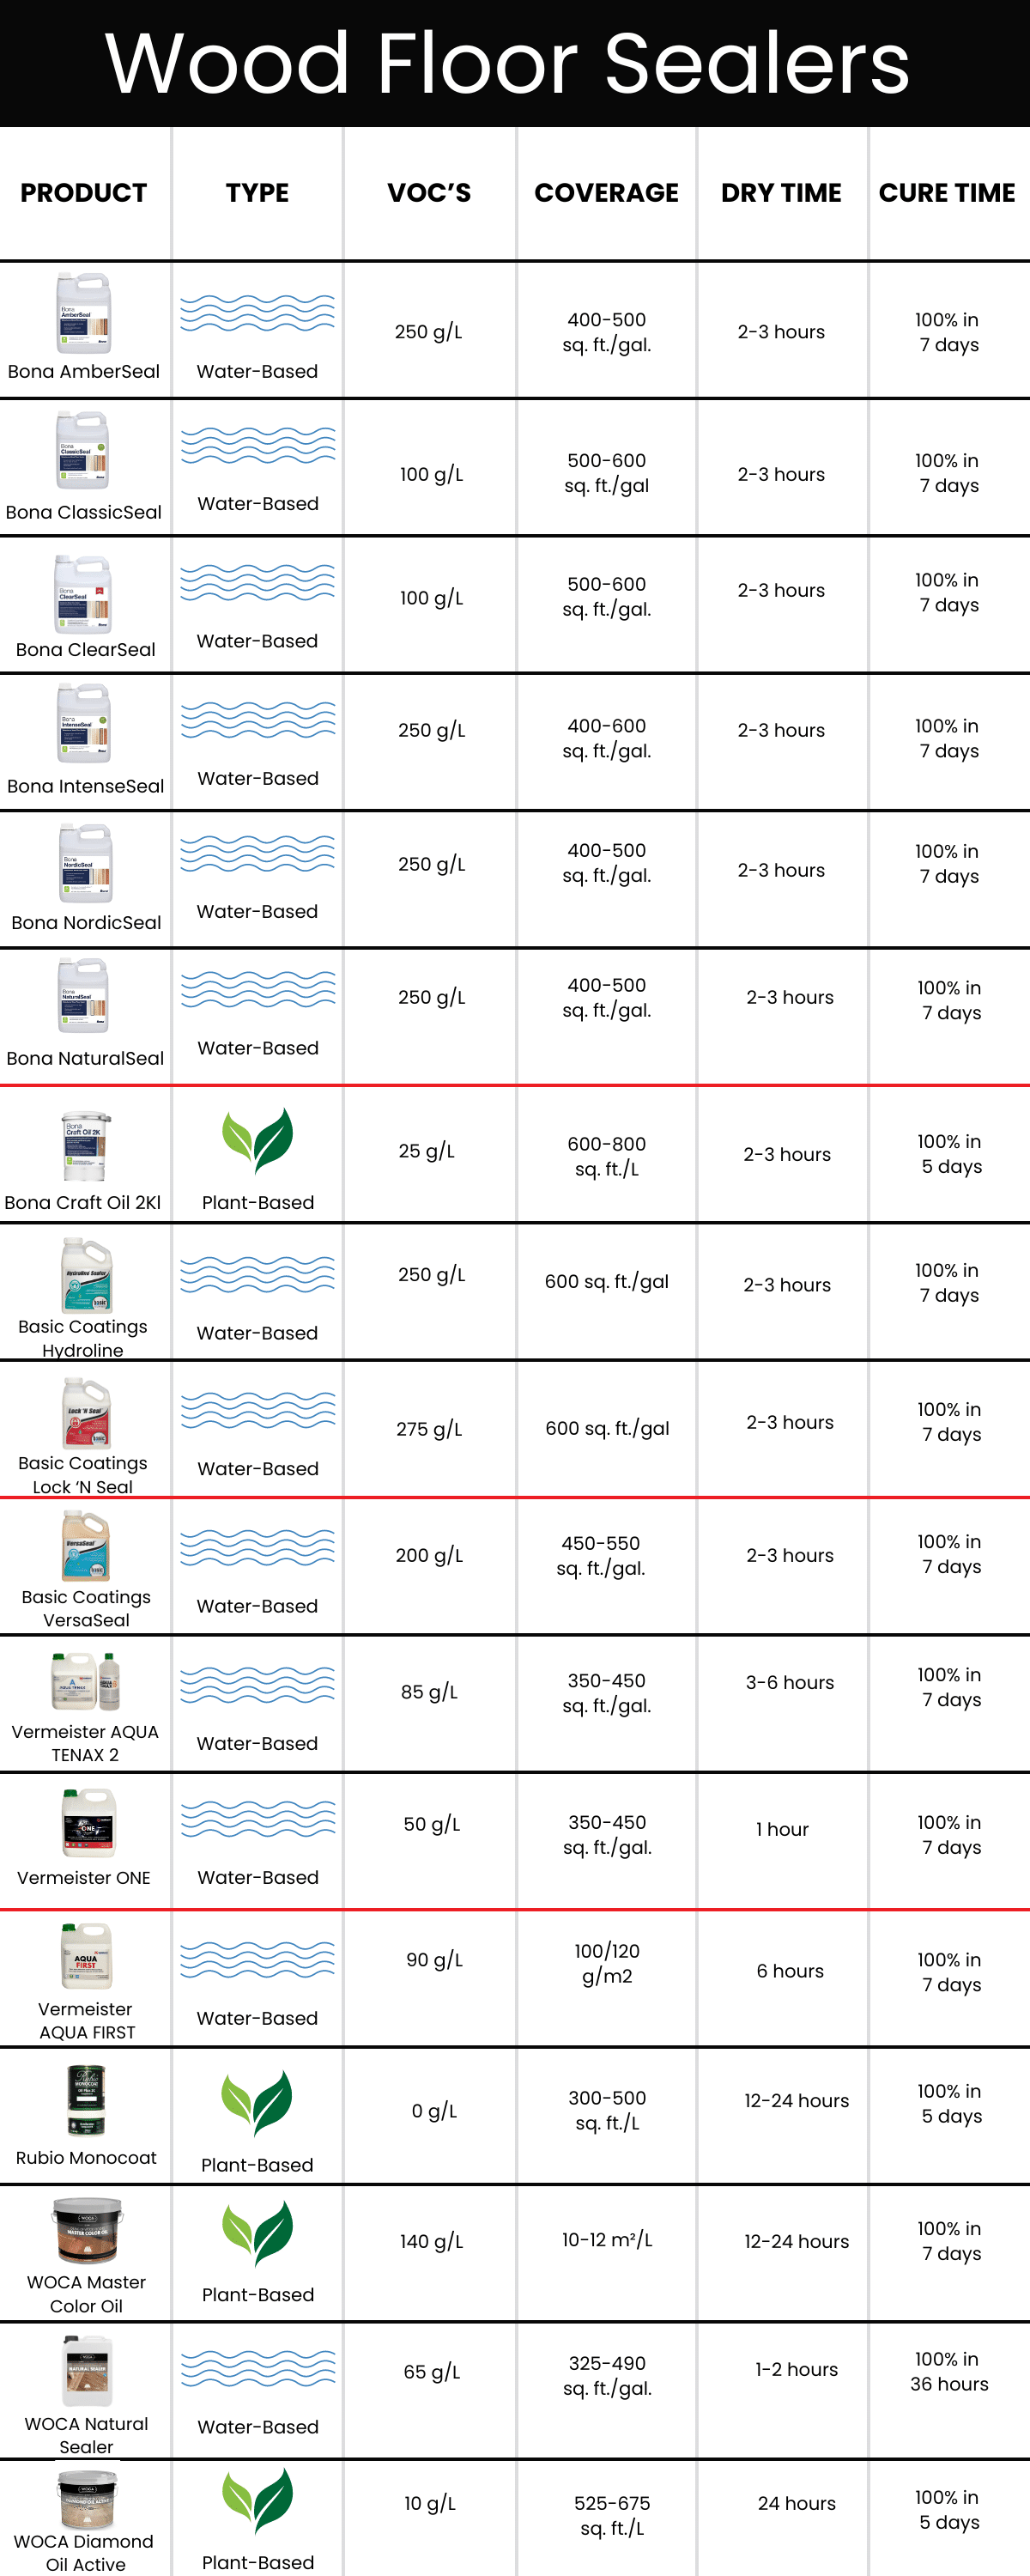
Plant-based sealers like Rubio Monocoat and WOCA Diamond Oil Active are hard wax and penetrating oils that work as both a sealer and finish.
Applying natural penetrating and hard wax oils is different than water-based.
The process is more like waxing a car.
Take a look at the chart comparing 17 of the best eco-friendly hardwood floor sealers (product type, VOC levels, coverage, dry time, and cure time), and browse our full range of top-quality sealers.
Applying Sealer Over Stain
Generally, you can apply stain and then apply sealer and finish; however, you will want to read about product compatibility in the product’s technical data sheets.
Always prepare samples of the products you intend to use so you can be sure.
How to Apply Sealer to Hardwood Floors
Applying a sealer requires knowledge and training. Reading or watching videos about how to do it is one thing. Doing it yourself is another.
Sealing is a straightforward process, but you do need to know the steps throughout the process, including the techniques and how and when to apply them.
In this section, you will see the different techniques required for professional results.
Have an Exit Plan
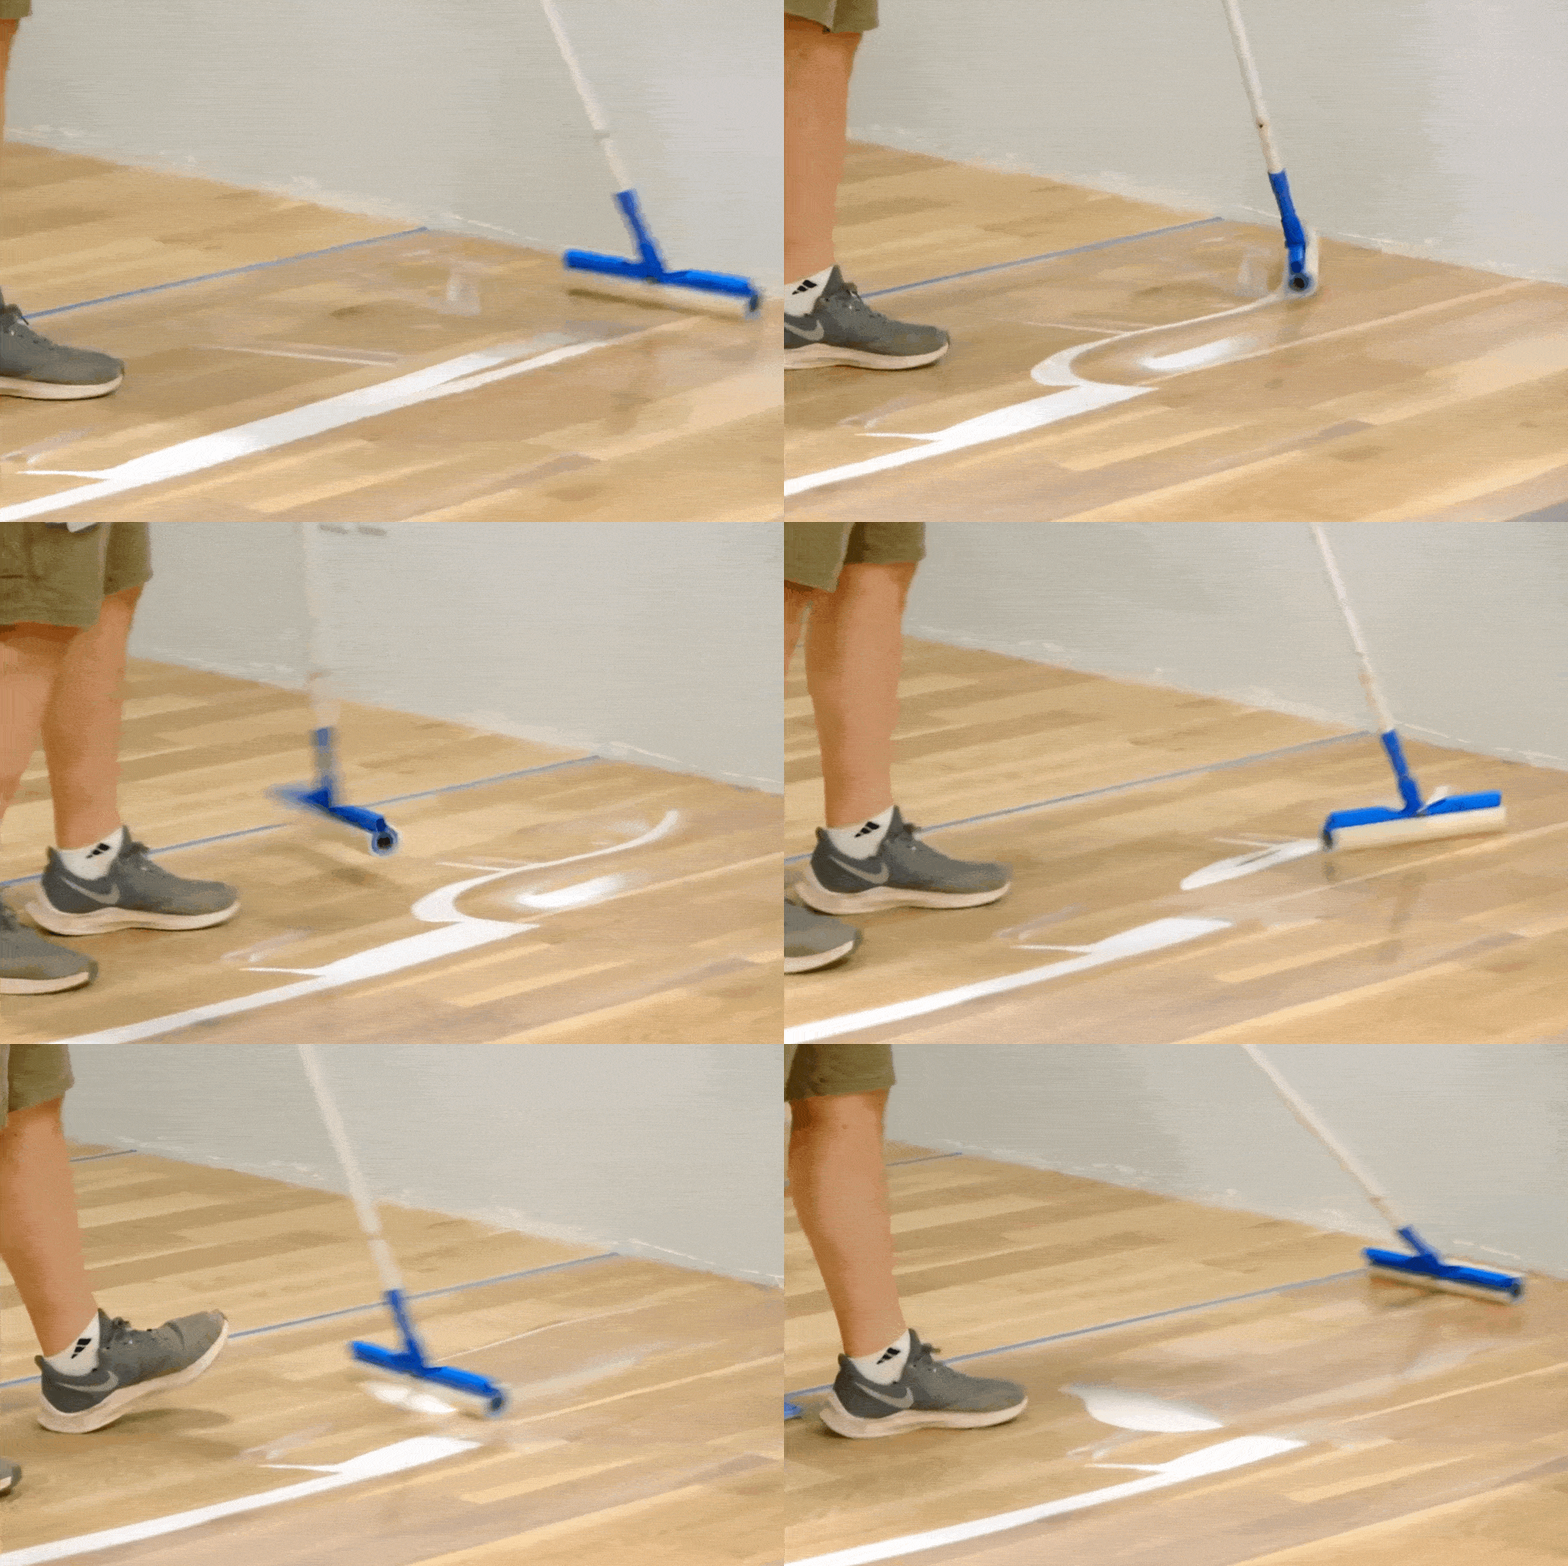
First, you will need to know how you’re going to get out of the room after you have coated the floor, so you don’t walk back over your work.
An S-Turn is a technique you can use to work your way out of corners without treading over wet sealer.
Once you know how you will get out of the room, you can pour product and get to work.
Coat the Floor
After you pour product onto the surface, you will want to cut-in the edges in the space from the wall about 12″ out.
Next, use your applicator to coat the floor. Try to avoid splashing if you can.
Don’t be too concerned when you’re starting out with streaks or slight imperfections. You will go through and even everything out.
Remember to Feather as You Apply Sealer
Feathering is an important skill that smooths out marks and blends the floor.
Use feathering with both the pad and applicator to remove streaks. If you don’t, and you try to repair the heavy marks later, you will find it’s one of the most difficult repairs to make.
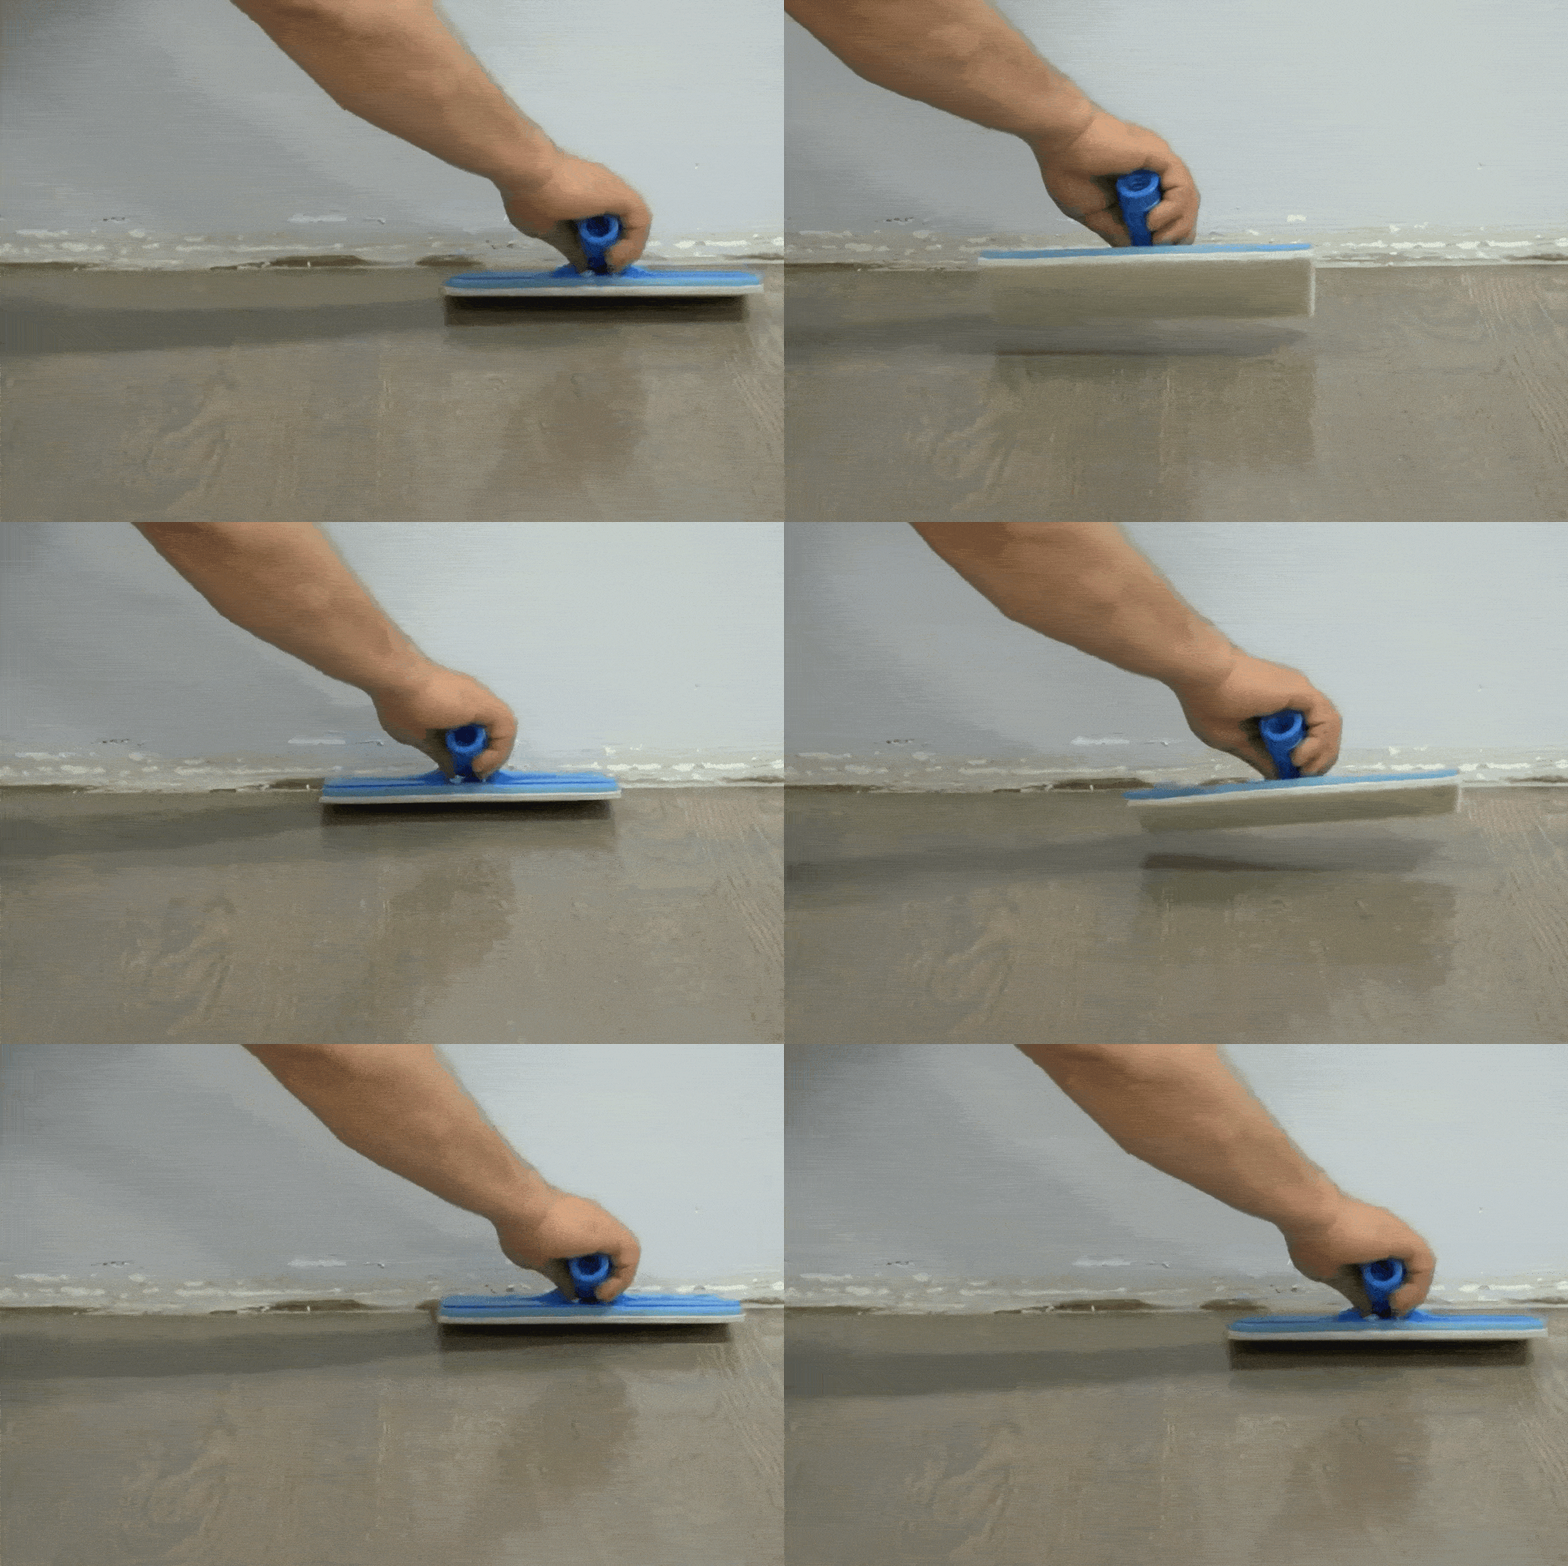
Feathering with a Cut-in Pad
Use your cut in pad at an angle. Don’t leave heavy marks by pressing down too hard.
You want to feather out short, just barely from the edge.
Feathering with a Roller
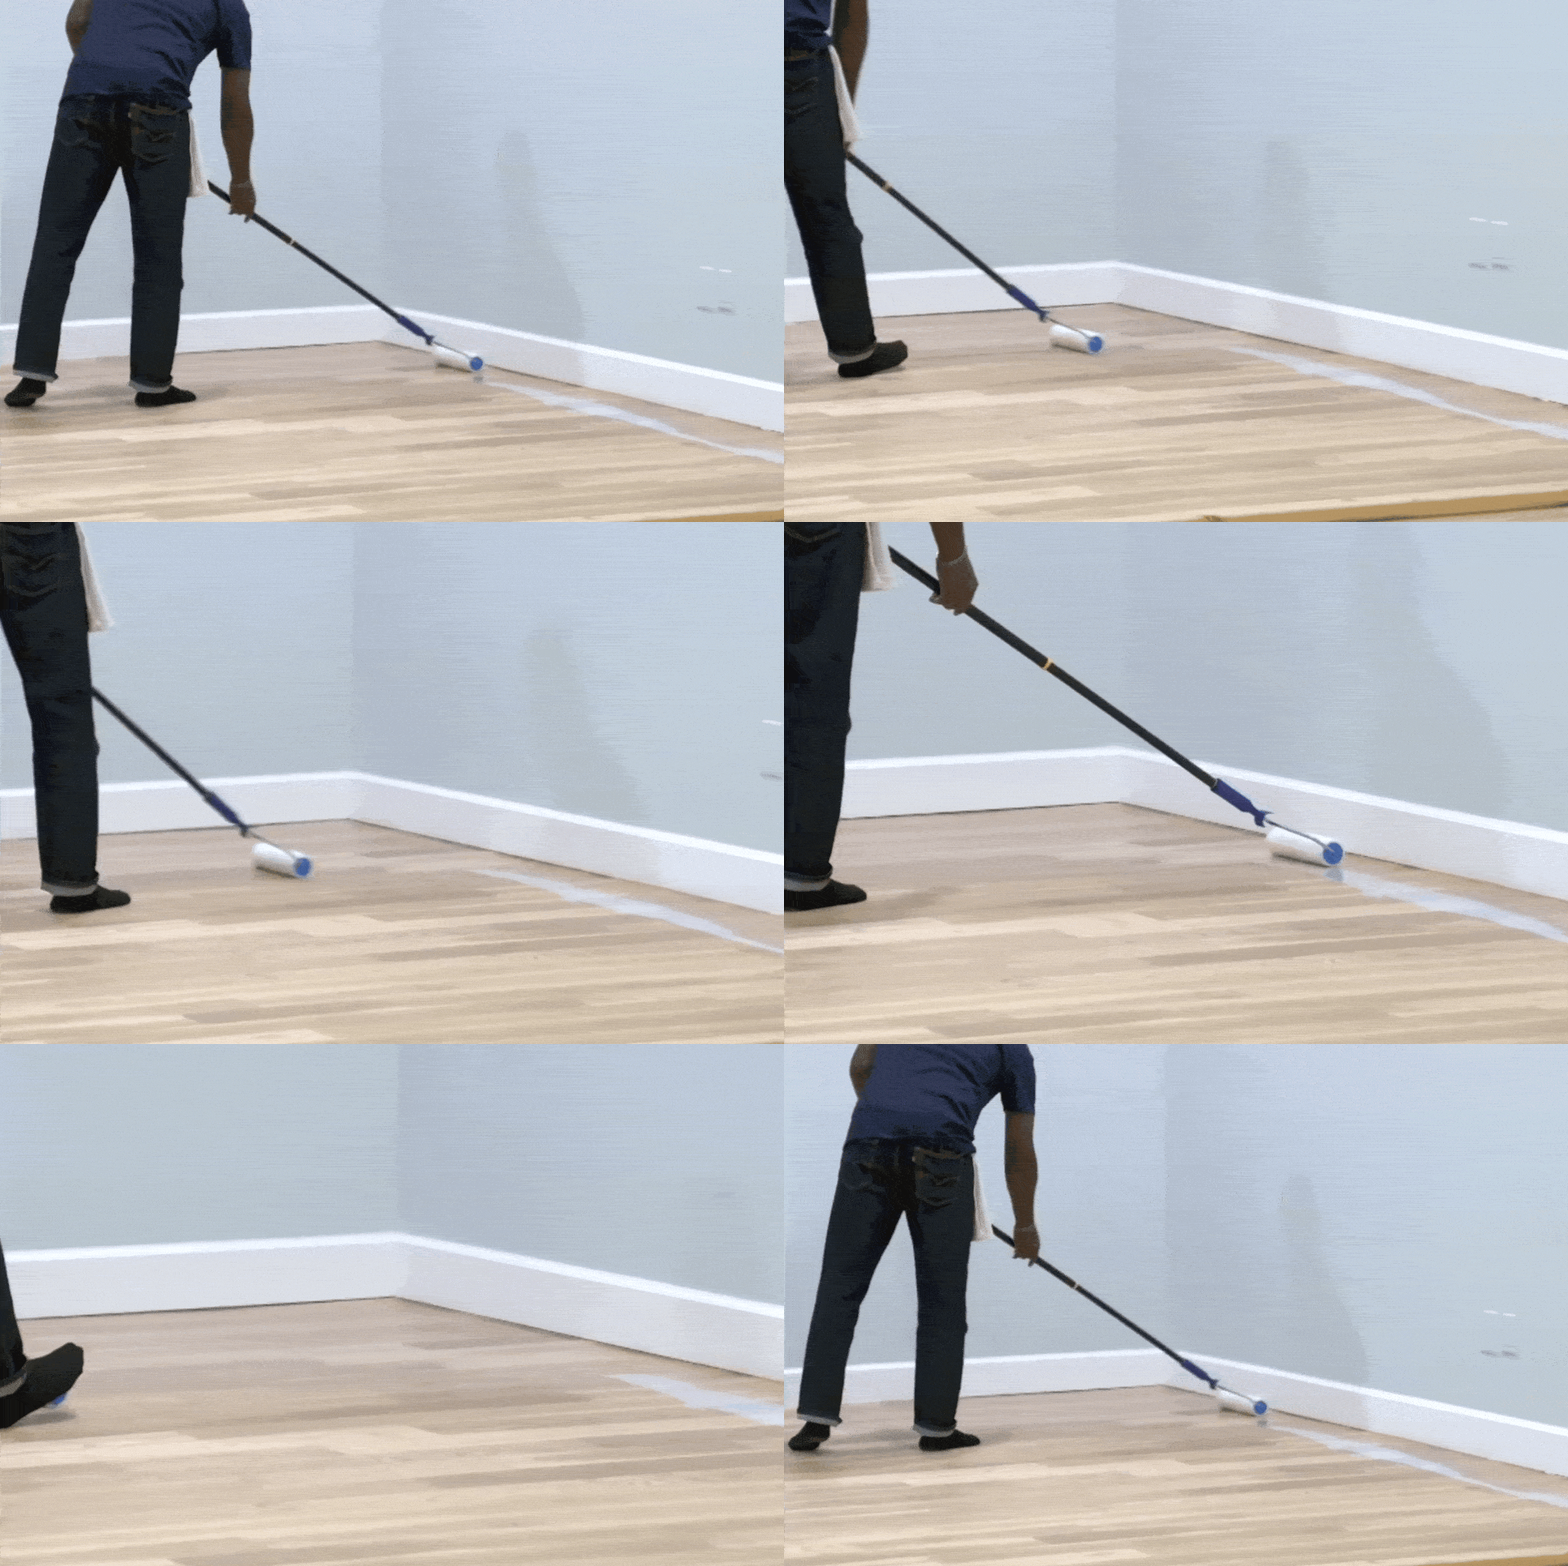
Use your fingers to apply the pressure and let the applicator do the work.
Nice and smooth. There’s no need for long feathering out.
After you put down your sealer, let the floor dry.
Once it’s dry, it’s time to check for and fix heavy marks and streaks.
Abrading for Smoothness
Abrasion helps to blend, smooth, and improve the look of the floor. You don’t need to abrade for adhesion – only for added smoothness.
Follow the product manufacturer’s guidelines and recommendations.
Remember, a coat of sealer provides a thin layer that’s around 1 mil thick, so don’t abrade in one spot for too long.
Be careful when you’re abrading next to the wall. Any time you are buffing in one spot longer than others, you’re going to take off more of the sealer.
After abrading, make sure to vacuum and then wet tack the floor using a dampened terry cloth and microfiber mop.
DIY Buffer Tip
If this is a DIY project, and you’re going to abrade, you will want to rent a standard 16″ floor buffer.
If you don’t rent a buffer, then you will have to abrade by hand or use a 5″ or other small random orbital sander to fix problems.
Wet-Tack the Floor to Discover Imperfections
After you abrade and vacuum, you can wet tack the floor with a dampened terry cloth and a microfiber mop.
This will get up any dust and highlight any missed areas, streaks, marks, or uneven areas in the sealer.
First, go around the perimeter of the room at least 12” out onto the floor from the wall. Finish the rest of the floor with a microfiber mop.
This simple process keeps you from running the mop into the walls and knocking particles onto the floor.
Take all the time you need wet tacking the floor, and if you can, have another set of eyes to help you spot any issues to address.
Fixing surface imperfections and problems
Burn through fix: The picture below has a burn mark from buffing. You can treat burn through areas like you would with stain repair. Take 120-grit sandpaper and slightly go with the grain before moving onto a finishing pad, such as a maroon pad.
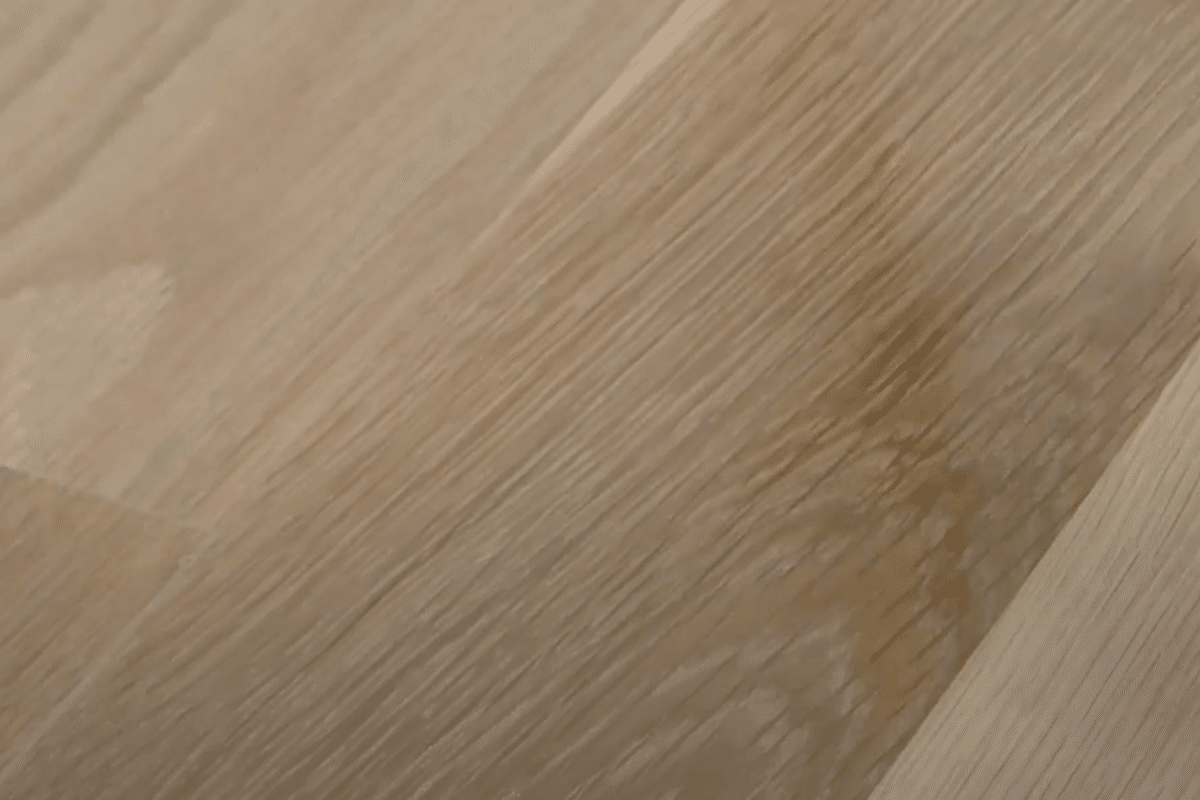
Next, take a little bit of the sealer and use a fine brush to feather it in the area
You can spot repair problem areas using sealer or apply a second coating of sealer before you move on and apply your finish.
Keep in mind that if you apply an additional coating of sealer, you will even everything out, but this may also increase the floor’s color.
Once you lock in the sealer with finish it will be too late to go back and fix them.
Summary
You can attempt sealing as a DIY project, however, completing the project at a professional level requires knowledge, training, and the right sealer, tools, and supplies.
Many experienced contractors warn against sealing your floors yourself unless you know what you’re doing.
You will need to follow best-practice methods for coating the floor.
Before you apply coatings, you also will need to ensure that the floor is properly sanded and cleaned.
The sealer you choose will affect the look and durability of the floor. At Panel Town & Floors we offer over 17 different water-based and plant-based floor sealers that you can compare using the chart above.
When sealing your floors, it’s best to have an exit plan before you get started, so you don’t work yourself into a corner.
As you’re sealing, you will want to know how to feather your cut-ins and passes to prevent streaks and marks from showing up after you lay down a coating.
If you have never finished a floor, and you want professional results, your best bet is to hire a skilled contractor.
A contractor can seal and finish your floor as close to perfection as possible.
But if you’re handy with this kind of work, you may be able to complete the project and be satisfied with how it turns out.
